Follow these steps to delete a single or multiple sheets from an Excel workbook:
1. Select the special process "[103] (*.XLS) Delete single or range of sheet(s)" from the Special Process drop down list. The file format is automatically set as *.XLS.
2. Next select the input and output files. If the input and output files are the same, sheets will be deleted from the input workbook. If the input and output files specified are different, a new output workbook will be created.
3. Click the Click here for Delete Sheet Details button.
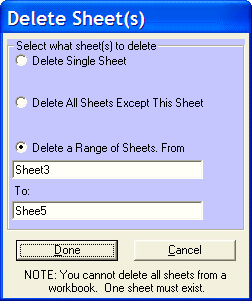
a. Select one of the three options presented to delete a single sheet, delete all sheets except one or delete a range of sheets. You may enter either the sheet name or index number or browse for same.
b. Note that you cannot delete all sheets from a workbook. At least one must continue to exist after the delete operation.
4. Optional: Click the Add (or ALT+A) button to add the task to the Conversion Task list. You may add multiple tasks to the Conversion Task list before initiating the conversion process by repeating Steps 1 - 4 as necessary.
5. Click the Convert (or F5) button to execute the process.
Additional Details
This special process can delete one or several entire worksheets.
Delete A Single Sheet is used to delete on 1 sheet.
Delete All Sheets Except This Sheet is used to specify the only sheet to remain in the workbook. All other sheets will be deleted.
Delete a Range of Sheets can be used to either specify the deletion of a single sheet or a range of sheets to delete. Note: the range is inclusive
Additionally, you can use this special process to delete sheets from a single workbook file, or a whole folder (and sub-folders) of workbooks. There must be at least one sheet in a workbook left. In other words, you cannot delete all the sheets in a workbook.
Note: If you name a sheet with only numbers, you will need to use quote marks around that name. For example, if you name a sheet 32, when you specify the Input Sheet you must input "32" with the quotes around the name so Convert XLS knows it is a name and not an index number for the sheet. If you browse for the file and click to select it, you will still need to manually add the quotes.
|
Softinterface Tools |
'Convert XLS' Information |
Site Info |
|
||
|
Making great software tools since 1999 |
|||||
|
|
|
||||
|
Copyright © by Softinterface®, Inc. All Rights Reserved. |
|
|